Easy concentric circles in Illustrator

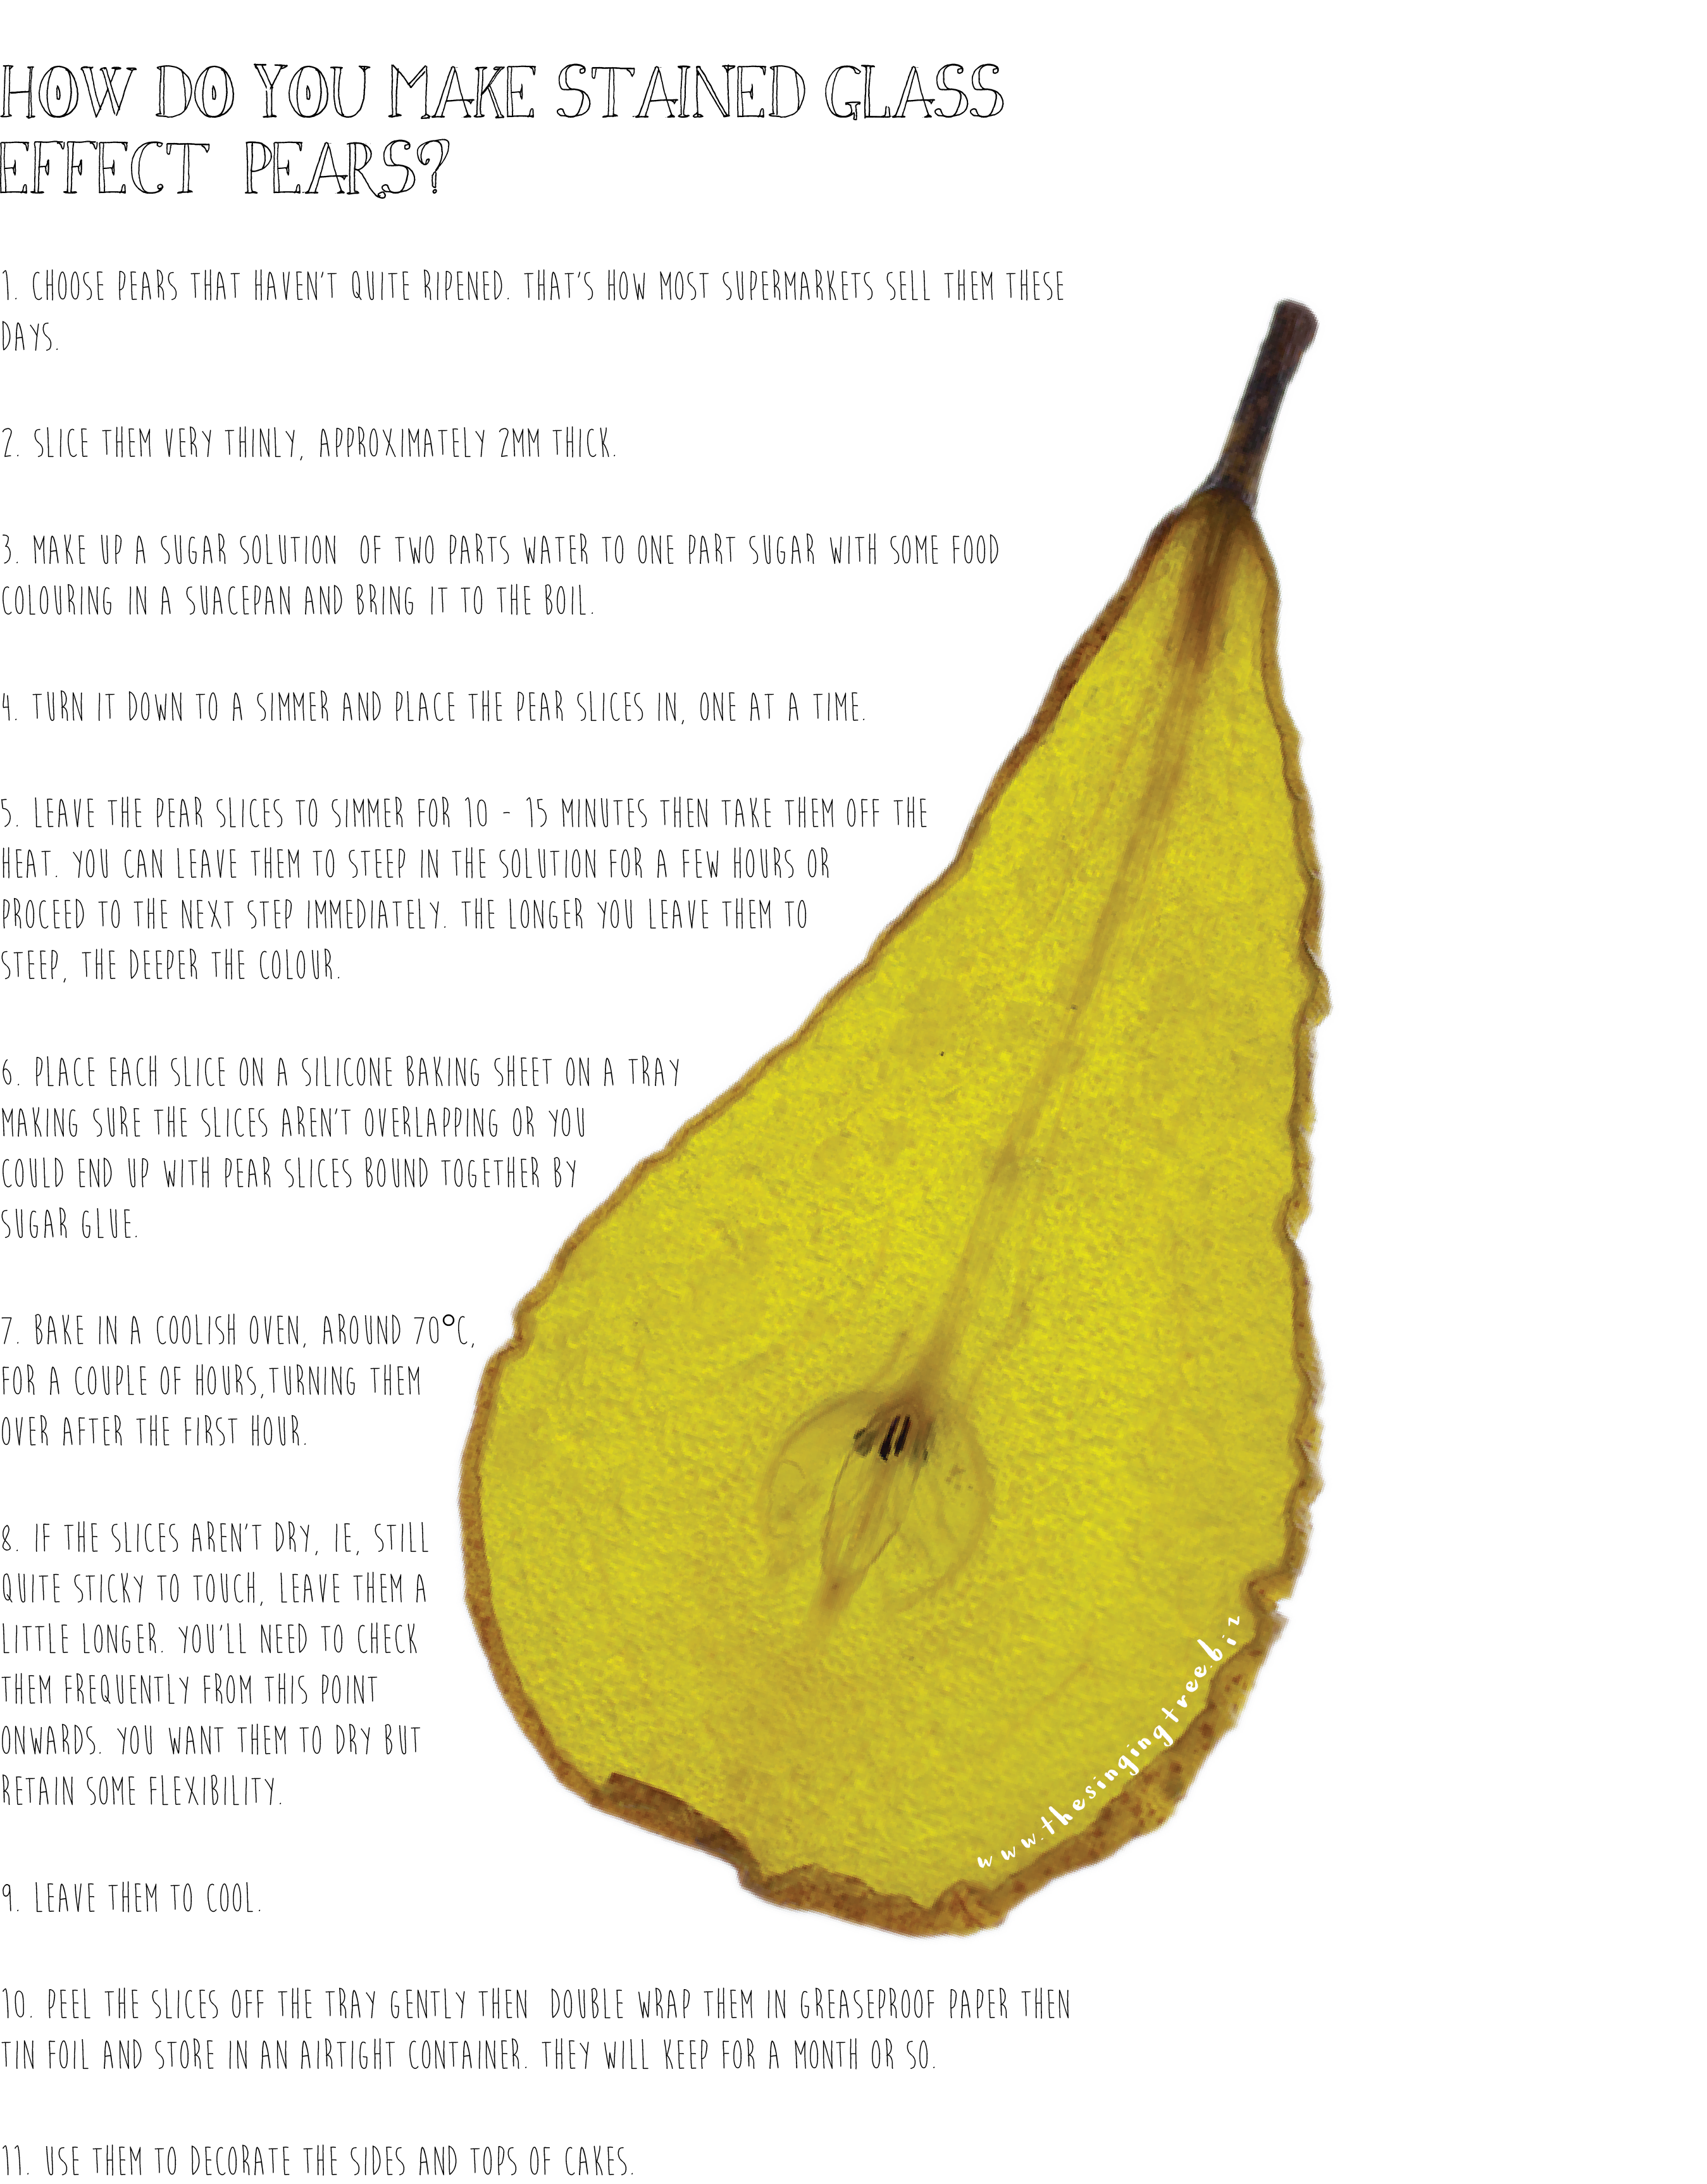
Creating concentric circles in Illustrator is super simple. You can create a circle and simply use Object Path>Offset Path to create a new one and specify the distance between the circles (for smaller, minus then the integer) than the original circle or larger. This method lets you create each circle one by one. If you want to create a bunch of them, go to Tools and select the Polar Grid Tool (it’s under the drop-down from the line segment tool). Double click to bring up the Polar Grid options and set the Concentric Dividers to the number of circles you want and take the Radial dividers down to zero. Hold down Shift as you draw to constrain them to perfect circles. If you want to use the circles as pathways for text, Ctl-A to select all and Ctl-C to copy (you’ll see why in a moment).

To change the stroke size, colour, etc, you need to Ungroup them (Shift+Ctrl+G). To chop the circles up a bit, use the Pen Add Anchor Point and click on the circles to create extra nodes; select nodes with the Direct Selection tool to cut the node using the Anchor Cut Scissor tool from the Properties Palette. Cut a node further along and  Delete to get rid of bits of your circles and leave other bits of circle segments. Change the colour, size, segment end style, etc using the Stroke options on the Properties Palette.

To add text so that it continues from the circle segments, lock your concentric segments layer, create a new layer then use the command Ctl-F to paste the circles, previously copied, in place. Under the Text tool, select the option Type on Path and type your text. Make use of the Add Nodes to cut the text path segment just after the coloured segment lines. You can also select with the Selection Tool (V) and drag the text path handles to shunt the text along.

The Polar Grid option is worth knowing about if you need to create a number of equi-distant circles quickly. And, it’s nice and easy.

Cracking on with things

Thursday was supposed to be hotter here (Ireland) than Barcelona. Must have been freezing in Barcelona, then. It was cold even with the heating and fire on. Anyway, a good day to bake.

II made a chocolate fudge cake, covered with chocolate buttercream.

The fondant flowers were dotted all over in a wild celebration of using up the fondant flowers I had stored away…

Gracie liked the oven being on 🙂

Obviously, running the oven costs money but heating costs are heavily subsidised in Ireland due to the fact that 40% of renewable energy is supplied by the cast of River Dance. (See MEP Daniel Hannon – responses Clickety-click.).

Have you ever suspected that inanimate objects harboured malevolent and hostile behaviour somewhere in their molecular structure? There’s a word for that. RESISTENTIALISM. It’s a noun relating to the theory that inanimate objects demonstrate hostile behaviour towards us.

USAGE (from Word a Day: Wordsmith.org):
“Scornful and uncooperative objects — pianos that mock our sausage fingers; computers that develop transient but alarming hypochondria; keys, socks, and teaspoons that scurry off to their secret covens and never return. There are certainly days when resistentialism seems the only explanation.”
Michael Kaplan and Ellen Kaplan; Bozo Sapiens: Why to Err Is Human; Bloomsbury; 2009.

I also love German for lots of  wonderful words; how about:

Backpfeifengesicht – a face in need of a punch (similar to the French tête-à-claque)

or

Zweckentfremdung, which translates to ‘goal alienation’, or ‘using something for a purpose not originally intended’. Our closest English word is ‘utilise’ which is very dull in comparison.

Crystallised pear slices cake decoration

This cake turned out brilliantly well at every stage. It’s a stack of 3 x 6″ chocolate sponge cakes, sandwiched with fresh buttercream flavoured and coloured with raspberry compote or goo.

Standard sponge ingredients: 8oz flour, butter and sugar with 2oz cocoa powder and a little coffee with sour cream to lift it up.

I used cake strips round the edges of the tins to prevent caramelisation of the sides and help to level the cakes.

The buttercream is a rich vibrant berry pink flecked with tiny traces of raspberry skin. I crumb-coated and put the cake in the fridge overnight then covered it with plain buttercream all around this morning.

Remember the crystallised pear slices I made a few weeks ago? It was time to use them. They went all round the cake with a few beautifully curled pear slices on top. Really loved the colours.

I flicked some gold lustre dust and fine edible glitter over everything. Finally, I picked out a few highlights by hand painting some edible gold (Pixie Dust brand) paint here and there.

Finally, the picture. My second go at Dark Photography.

Mr Bee cut a side side off an old printer box, lined it with black foam board and pinned the construction together with T-pins, leaving a vertical gap to create a chink of light between boards on the open side. I placed a diffuser-covered light to the open sideand mounted my camera on a tripod facing and cake for a head on shot with a 50mm lens.

I like the shot. I love the vibrancy of the colour of the pear slices in the light and the otherwise dark, atmospheric nature generally.

Possibly a little too dark…. here it is slightly lightened up:

Slightly less dark still?

Want to see the cake in full light?

Fruity cakes

This cake was inspired by a Preppy Kitchen recipe. It was so light and lemony – just lovely to make. It was odd making a sponge without egg yolks but did make for a very white, fresh looking cake. Mine is layered with blueberry buttercream, crumb-coated with the same then finished with a rustic coating of lemon buttercream, stained with streaks of blueberry juice.

The freezer was getting a bit full so I defrosted a batch of cupcakes made a couple of weeks ago and covered them in raspberry buttercream. I like to buy packs of frozen fruits – they have to be fresh to be frozen so you know you’re getting fruit picked at their best. I use these to make fruit compote or fruit goo at a moment’s notice.

I pour about 150g into a saucepan and heat them to a simmer with maybe a TBS of sugar. Simmer and stir till the juice evaporates and the fruit reduces to a thickish goo. Sieve (a muddler is a great tool to help grind the goo through the sieve) making sure you scrape the underside of the sieve to catch every last bit into a jug. There you have it.  Goo.Let it cool and it’s ready to use. Use an apple corer to core a little chunk of your cupcake out and fill it with the goo. Makes a delicious filling.

Finally, made a swirl of piped buttercream (isn’t the colour intense and yet it’s totally natural!) and sprinkled hundreds and thousands over the top. Homely, informal tasty, fresh cupcakes.

Cherry Sponge Cake

Mr B is just better at some jobs than me. Fact. Otherwise I would do them. He can be, by nature, a difficult person to nudge along, though and he will very frequently  frequently often sometimes leave things n-e-a-r-l-y done.

We’ve recently had a new fitted kitchen and Mr B has done a lot of finishing and decorating. He’s worked really hard and the kitchen has been a PITA at times but  it’s looking so clean and bright that I love it already. He’s done a fantastic job, good man. I don’t want him to collapse in a heap getting it finished but it’s frustratingly nearly done.

To take my mind off things, I made this cake yesterday.  It’s an almond sponge layered with cherry buttercream (cherry compote or ‘goo’ with more cherries roughly whizzed in the blender and sieved a little to get rid of excess juice, all mixed into some buttercream). It’s topped off with chocolate gananche and a bunch of fresh cherries, ripe and sweet.

The cake was amazingly fresh, light and tasty. Took two slices round to my neighbour – she rang me some 30 mins later to tell me it was the best cake I’d made – EVER! Made my halo a bit heavy, I can tell you but what a lovely compliment.

Also had a go at dark photography.  It’s sometimes called ‘Mystic Light’, or Chiaroscuro (an Italian term pinched from the art world to describe a technique that emphasises the the contrast between shadow and light in an image.

I extended my kitchen table full length, made an enclosure out of black foam board held together with T-pins (the very same as used for blocking crochet) and lined the bottom with an A2 length of black mount board. I left a slit between two sheets of foamboard to let in a ‘sliver’ of light.

My  tripod faced the scene and lowered for a head on shot. The opening between the foamboard was covered with a diffuser (the light from the window was streaming in).

The shot above has been enhanced with various Photoshop filters increasing shadow, contrast, blacks, reducing whites and highlights, masking a couple of highlights and using Curves to dampen them a little, etc.

I’m following The Bite Shot on You Tube for tips and techniques https://thebiteshot.com/

Finally got round to making a tray of meringues using a Sultane nozzle.

xoxoxo

Fondant flowers with sugar paste

I’ve been keeping occupied with all sorts of little cakey things like these fondant flowers. I added a tsp of Tylo powder to 250g of shop-bought fondant, kneaded them together, then wrapped it in cling film for a day. This mixture makes a reasonable sugar paste.

Sugar paste has greater pliability and strength than plain fondant though not as strong as pastillage. Instead of Tylo, if you wanted to make your own flower paste, you could add gum tragacanth or CMC (carboxymethyl cellulose) to the fondant.

The flowers were molded in a set of Katy Sue designs (and other molds). I dusted them with pearl and lustre dust afterwards.

Edible cake decorations: pineapple flowers

These ‘flowers’ are actually slices of dried pineapple. They’re chewy, sweet and tasty and decorate rustic-type cakes beautifully.

To make pineapple flowers:

  1. Slice the top and bottom off a fresh pineapple.
  2. Remove the outer skin or peel.
  3. Use a melon baller or similar to dig out the ‘eye’s – when you have removed the outer peel, you’ll see what I mean.
  4. With a thin, sharp knife or mandolin, cut the pineapple into almost translucent slices. Take care to keep your fingers out of the way!
  5. Place the slices on kitchen roll and blot each one to remove the excess pineapple juice.
  6. Place on baking parchment or a silicone sheet and bake on a low setting – between 70 and 80º – for approximately 4 hours. Check them regularly and when they are almost dry and still have some flexibility, take each one and place inside a yorkshire pudding tray, muffin tray or similar. This will let them dry with a flower-like curl.
  7. Bake for another 30 mins or so.
  8. Remove from the oven and let them cool.
  9. Place them in an airtight container layered with kitchen roll. They will keep for about a month in a cool, dry cupboard or pantry.
  10. Use them to decorate rustic cakes or cupcakes.