A blog for me, about the things I like. After Effects, Procreate, Illustrator, Photoshop, Drawing, Painting, Paper Cutting, Sewing, Embroidering, up-cycling old furniture. Whatever grabs me in the moment/
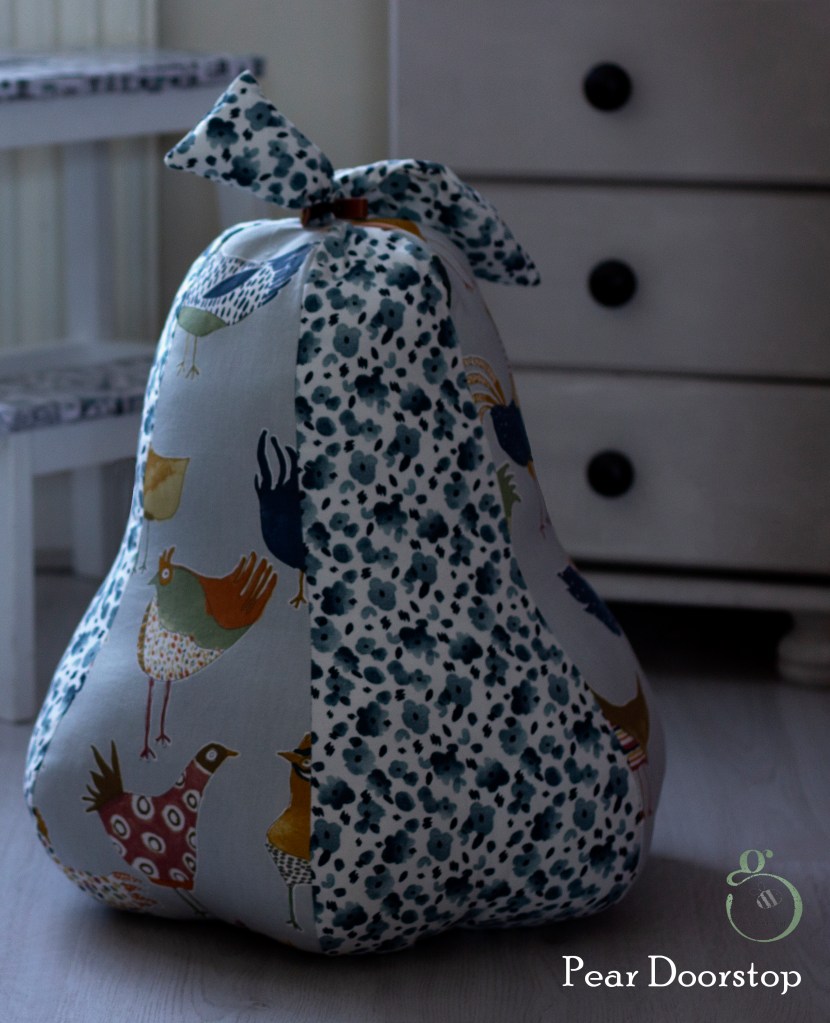
I’ve made pears small using Christmassy fabric for decoration, larger for pincushions and larger still, my biggest to date, a doorstop. Simply scale the template up or down, accordingly.
The door stop has a small bag of fresh cat litter inside to give it weight in addition to the cushion-fulls of stuffing. 🙂 Loads.
I hope the instructions are clear enough; it really is an easy pattern.
What a week – first some lovely visitors. Made chocolate biscuit cake together. Helped A make a beautiful Samsara bird for A to take home to her mum. Went to Skerries and collected some nice, fat rocks for my garden (A and Other went to the local silversmith for the afternoon and had a few hours crafting their own designs in silver). I did it a few years ago. Very absorbing and a nice way to spend an afternoon.
Also, had a bit of a splurge in Dublin (you know I’m a material girl!) – might take pics and show you the jazzy fabric I bought. Not anything I would normally go for but it’s definitely got a real buzz to it.
The visit could have been a disaster. Turned out that A, who thought she would get the results of her MA Aug 10th would actually be getting them on the Monday. Well, nobody slept well Sunday night. The result came by e-mail at 9.00 am the following morning and brought relief, delight and sunshine to the day. She passed! We whooped and all had big grins slapped over our faces for the rest of the day – though the day was a bit shorter than most as we were all pretty much flaked by early evening and toddled off to our beds to catch up on some sleep.
So, a happy week filled with roast turkey dinners, yorkshire puddings, fruit crumbles, lasagnes and spicy chicken saucies with chips. Glasses of wine in the evenings, happy laughter and happy conversations.
All too soon it was time for them to leave. Always a teary moment. Since then, the house has been cleaned top to bottom – just something I do! Keeps me busy and takes my mind off the empty house.
Finally, I sat down, designed the bird and then sliced and snipped away until I became truly absorbed in the process and got myself grounded again.
The main design was created in Illustrator CS6 but earlier versions, at least to CS4, have the functionality to create this.
Triangle ‘Template’
1. I started by using the Polygon tool in Illustrator to create a triangle. Mine was 90mm high x 31.3mm wide. I used trig so that I could calculate an angle of 20° (the Sine of 10° times 90 – gives half the width of the base ) at its apex so could rotate it later without overlapping.
2. Lock the layer. The triangle will be subsequently deleted but you will use it as a template to ‘contain’ all the graphic elements you want to include in your design.
3. Create a new layer.
4. Draw, import, etc, graphics to ‘fill’ your triangle , starting at the top and reducing the size of the elements as you proceed down the template. I used Caslon Ornaments (True Type free font – just Google it and you will find it easily).
Modifying Font Characters and Glyphs (Optional)
5. To further modify and decorate installed fonts, characters and glyphs, go to Type>Glyphs and go through your installed fonts for pretty dingbats (like me! Lol!) or other Wingdings, etc, to see if there are other ready to use elements for your design.
Switch to the Direct Selection tool (black arrow) and go to the drop-down menu: Type>Create Outlines.
6. Go to the Object menu and select ‘Compound Path>Release. You might need to go to the Swatch palette and change the Stroke to, say, 0.25 and remove the fill colour as they sometimes end up filled as a solid block of colour.
Once released, the separate elements of the graphic can be coloured individually – filled with a gradient or solid colour, stroke colour can be changed,etc. When you’re done, group them (Object>Group).
7. I created a centred vertical line of elements – remember to select them and use the Align command to centre them vertically. Select then Object>Group.
8. Fill the template up with more graphics – just do either the left or the right of your centred line of elements. Taper and reduce the size of the elements as you fill up the triangle shape. Get a number of them to touch the triangle outline to preserve some definiton of the triangle shape.
Back to the kaleidosope-design
9. Select and group these side elements (ie, de-select or omit the central ones). Group then Copy them (Command >C).
10. Paste the elements (Command V) then go to Object>Transform>Reflect>Vertical.
11. Align the right and left sides of the design to the top or bottom (makes no odds which end). Make sure that you position the copied elements so that they touch the opposite side of the triangle.
12. Group right and left sides. Now select the right, left and vertically-centred elements. While all are selected, click on the vertical group (so that everything aligns in relation to this) then select Align>Vertical Centre (icon). Group the three sets together.
13. You can delete the layer with the triangle on if you wish. It has served its purpose and is no longer needed.
14. Select your ‘triangle’ of graphic elements. Go to Effect>Distort & Transform>Transform.
A dialogue box with various settings will display:
a. Scale (Horizontally & Vertically) 90%
b. In the Number of copies, enter 17 (results in 18, the 17 copies plus original).
c. Rotate>Angle: Enter 20°
d. On the small square with 9 black spots, click the bottom-middle spot.
Hit: Ok
15. You need to go to Object>Expand and Ungroup if you want to tweak your design in any way.
That’s it. You can play with Bevel & Embossing or different lighting effects under the filters etc. Change the background colour. Make multiple copies of the ‘fractal and mirror or reflect them, scale them. It’s up to you and your imagination but this is how to create a basic kaleidoscope effect in Illustrator. You could always copy into Photoshop and use the PS tools if you’re more familiar with them.
These chocolate cupcakes arelovely. Pre-heat oven to 180 / gas mark 4 Fill a baking tray with as many cupcake cases as will comfortably fill it with room for the tops to spread
Ingredients
8.8oz soft butter 8.8 oz SR flour 8.8oz caster sugar 4 tbsp milk 1 oz cocoa powder 4 large eggs
Method
Cream the butter and sugar together then beat in the other ingredients with a mixer until smooth and fully mixed in.
Divide the mixture between the baking cases.
Bake for 20 – 25 mins or until well-risen and golden brown.
Place on a cooling rack and allow to fully cool before icing
Icing
1lb 1oz of sifted icing sugar 8.8oz soft butter 1 oz sifted cocoa powder Smarties/edible glitter or other edible decorations to finish
Beat the ingredients together until smooth
Pipe or spread the icing on the cakes and decorate with edible glitter or other edible decorations
These cookies are really good – almost biscuity-crisp around the edges with a soft melt-in-your-mouth middle. This recipe makes about 20 cookies. Enjoy.
Preparation
Pre-heat oven to 170 C, (Gas Mark 5)
Line a couple of baking sheets with non-stick baking parchment
Ingredients
100 g butter
50 g coconut oil
80 g of demerara sugar
80 g caster sugar
2 tsp of vanilla essence
1 large egg
225 g plain flour
1/2 tsp baking powder
1/4 tsp salt
200 g chocolate with hazelnuts (I don’t like cooking chocolate so buy standard eating chocolate but use what you prefer)
Tube of Smarties or other sweets for decoration.
Method
Blend butter, sugar and coconut oil.
Beat in the egg and vanilla essence.
Mix in the flour, baking powder and salt.
Crush or smash the chocolate (I leave it in the packet , place it on a wooden chopping board and give it a bit of a thrashing with a rolling pin – think Basil Fawlty, the broken down mini and the tree branch) and stir into the mixture.
Use a dessertspoon to spoon small mounds of the mixture onto the baking sheets, leaving room between them so they can spread (hence the name ‘bumpers’). Flatten them slightly with the back of the spoon but NOT pancake thin – just less rounded and more a consistent thickness throughout.
Place on an upper rack in the oven and bake for 15 mins or so. They are ready to come out when the edges have browned and the centres still feel a little squidgy.
When done, remove from the oven and allow to set on the baking sheet for a few minutes. If you wish, press a few Smarties into the cookies while soft then transfer onto a cooling rack until cold.
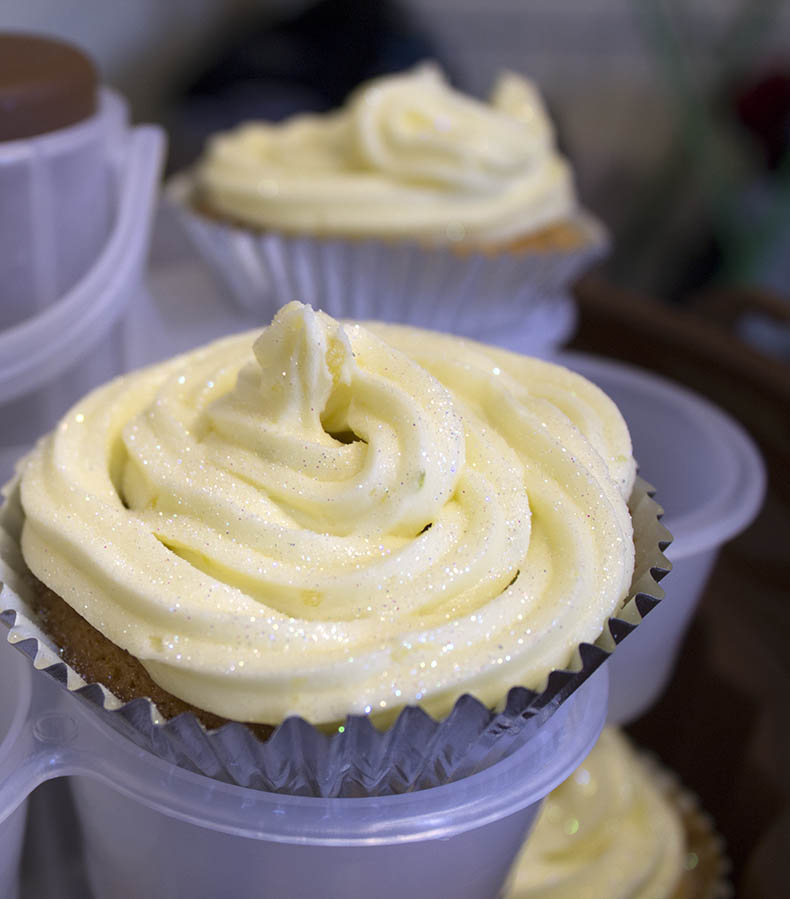
I baked some lemon and lime cupcakes yesterday. Usual cupcake recipe with the zest and juice of a couple of unwaxed lemons and limes in the mixture and buttercream topping. They were delicious.
Want the recipe? Here you go:
Lemon and Lime Cupcakes – makes about 24 cakes
Ingredients
250 g soft butter
250 g self-raising flour
250 g caster sugar
4 tbsp of juice from the lemon and lime (save half for the buttercream icing)
4 large eggs
Finely grated zest of 2 small lemons and 1 small lime (save half for the buttercream icing)
Method
1. Put all the cake ingredients into a bowl and beat with an electric whisk until mixture is smooth.
2. Place the baking cases on a baking tray and divide the mixture between them.
3. Bake in a preheated oven at 180°C/gas mark 4 for 20–25 minutes until nicely risen and light golden brown.
4. Put the cakes onto a wire cooling rack, and leave to go cold.
Lemon and lime buttercream icing:
375 g soft unsalted butter
625 g sifted icing sugar
The juice and zest saved from the sponge mix
Edible cake decorations. I like holographic edible glitter.
1. Put the butter and half of the icing sugar into a bowl, and beat with an electric whisk until smooth. Add the lemon/lime juice and the rest of the icing sugar and beat again until light and fluffy.
2. Ice the cakes using icing bags and nozzles or use a spatula to spread the buttercream on.
“Our deepest fear is not that we are inadequate. Our deepest fear is that we are powerful beyond measure. It is our light, not our darkness, that most frightens us. We ask ourselves, who am I to be brilliant, gorgeous, talented, fabulous? Actually, who are you not to be?…
Your playing small does not serve the world. There is nothing enlightened about shrinking so that other people won’t feel insecure around you. We are all meant to shine, as children do…
And as we let our own light shine, we unconsciously give other people permission to do the same. As we are liberated from our own fear, our presence automatically liberates others.”
–Marianne Williamson
I also find this adaptation of Desiderata very beautiful arranged as a positive affirmation:
Desiderata
I go placidly amid the noise and the haste, remembering what peace there may be in silence. As far as possible, without surrender, I am on good terms with all persons. I speak my truth quietly and clearly; and I listen to others, even the dull and the ignorant–they too have their story. I avoid loud and aggressive persons; they are vexations to the spirit.
I try not to compare myself with others, for I know there will always be greater and lesser persons than myself. I enjoy my achievements as well as my plans. I keep interested in my own career, knowing it is a real possession in the changing fortunes of time.
I exercise caution in my business affairs, for the world is full of trickery. But I do not let this blind me to what virtue there is; many persons strive for high ideals, and everywhere life is full of heroism. I am myself. I especially do not feign affection. Neither am I cynical about love; for in the face of all aridity and disenchantment I have seen it is perennial as the grass. I take kindly the counsel of the years, gracefully surrendering the things of youth.
I nurture strength of spirit to shield myself in sudden misfortune. But I do not distress myself with dark imaginings. I know that many fears are born of fatigue and loneliness. Beyond a wholesome discipline, I am gentle with myself. I am a child of the universe, no less than the trees and the stars; I have a right to be here. And whether or not it is clear to me, no doubt the universe is unfolding as it should.
Therefore, I am at peace with the world. And whatever my current labors and aspirations, in the noisy confusion of life, I keep peace in my soul. With all its sham, drudgery and broken dreams, it is still a beautiful world. I am cheerful. I strive to be happy.
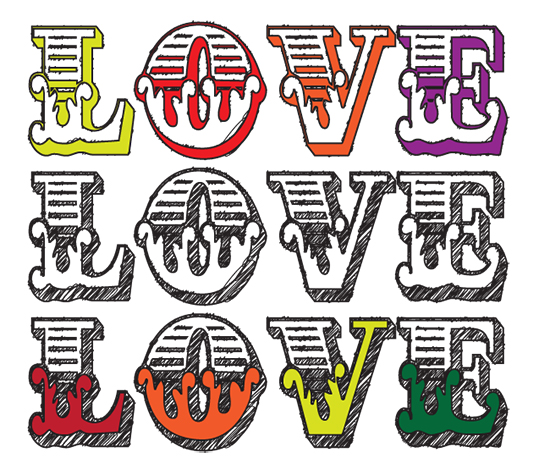
This tutorial is about how to turn a font into a hand-rendered effect font and how to fill selected elements within the font with colour or gradients.
1. Open a new document in Illustrator. The size is up to you.
2. Type in some text using any font you like. I can’t remember which font I used here – I think it may have been Circus or Cast Iron.
3. With your text selected, go to the Swatch palette and remove the fill and stroke.
4. With the text (now invisible) still selected, go to: Window>Appearance and click the little group of horizontal lines on the right to display a drop-down menu. Select Add New Fill.
5. You’ll see a small block of colour – leave the default colour black, keep it selected and go to Effect>Stylize>Scribble and apply the following settings:
Angle: 45°
Path Overlap: 0 px
Variation: 2 px
Stroke Width: 1 px
Curviness: 0%
Variation: 50%
Spacing: 2 px
Spacing Variation: 1.5 px
6. Appearance Panel>Add New Stroke and give the text a 2 px stroke.
7. With the Stroke still selected, go to Effect>Distort & Transform>Roughen and apply the settings below:
Size: 0.5%
Size, select the Relative check button
Set the Detail level to 30 Points: click on the Smooth checkbox
Click OK and the scribble effect is created.
8. Select the black arrow selection tool (V) go to Type>Create Outlines
9. With the text still selected (now displaying as outlined with many nodes) go to Object>Ungroup and keep repeating this until the option to Ungroup is greyed out.
10. With the Selection Tool (V), select elements within your text and fill with any colour or gradient you like from your Swatches or Gradient palettes.
To apply the Scribble effect to other fonts without having to repeat this process, save your ‘scribble’ by opening a New Graphic Style in the Graphic Styles panel and giving it a name. To use it again, create your new text, select it and click on your *name scribble* from the Graphic Styles library.
Cream the butter and sugar together then add the flour and knead until it forms a pliable ‘dough’.
Roll out onto a lightly floured surface and use any cutter you like to cut your shortbread into approx. half- inch thick shapes.
Sprinkle with sugar, place on a greased baking tray and bake for roughly an hour at gas mark 2 or 150 degrees until they are light or golden brown. They will feel slightly soft to touch but will firm up on the cooling rack when you take them out.
Home-Made Crackle Glaze and how to use it
1. Dilute (a little) some PVA glue with water and apply a layer of the glue onto a primed or painted surface.
2. Before it’s dry, apply another coat of paint (can be a different colour or same as the first coat) but make sure you apply all the strokes of paint in one direction only. As the paint and glue dry at different rates, the top surface cracks open and gives it the ‘crackle’.