Go-to paste, lace, modelling chocolate and piping gel recipes

Hello everyone. Today I’m posting a collection of various fondant and sugar paste recipes.

Piping gel is useful as a light glue, for example, when working with wafer paper, and has the useful property of drying clear. If you need a more substantial glue, dissolve some sugar paste into it. You can also use piping gel to:

  • Create ‘water’ such as little ponds when decorating cakes. You can add food colouring to tint it blue or leave it clear. It dries with a shine.
  • You can add edible glitters to add sparkle to your sugar craft creations!
  • It’s good for creating stained glass effects.
  • Use it as a glaze on fruit tarts.
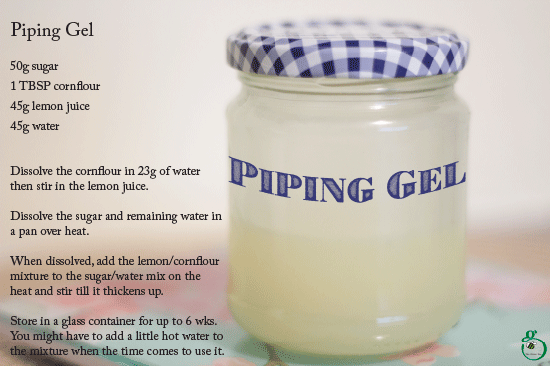
Piping Gel

  • 50g sugar
  • 1 TBSP cornflour
  • 45g lemon juice
  • 45g water

Dissolve the cornflour in 23g of water then stir in the lemon juice

Dissolve the sugar and remaining water in a pan over heat

When dissolved, add the lemon/cornflour mixture to the sugar/water mix on the heat and stir till it thickens up.

Store in a glass container

You might have to add a little hot water to the mixture to thin it out a bit if you leave it some time before using it.

Pastes and Fondant

I’m fairly sure that petal paste, flower paste and gum paste are one and the same thing. Flower paste is used to make delicate, life-like ‘fondant’ creations such as … flowers! It’s elastic but tough and can be rolled out to an almost transparent thickness without tearing.

Gum paste

Flower / Petal / Gum Paste

  • 500g icing sugar
  • 2 tsps (approx. 8g ) egg white powder mixed with 3 TBSPs of warm water (let sit about 20 mins)
  • 1 tsp gelatine mixed with 3 TBSPs of warm water, let sit for 10 mins
  • 4 level tsps. of warmed coconut oil
  • 2 x 5ml tsps. of liquid glucose
  • 3 tsp tylose

Place 400g of icing sugar into a bowl.
Add the tylose to the remaining 100g of icing sugar in a separate bowl.
WARM the gelatine mixture in the microwave and mix in the liquid glucose and coconut oil.

Stir the 400g of icing sugar into the egg white.

Add the warmed gelatine mixture to make a soft paste.
Add the 100g icing sugar / tylose and knead together.

***If you want an even tougher mix, add some Gum Tragacanth to your gum paste – just a squinch and only to a little of your gum paste. Knead it in and leave for a half hour or so to ‘cure’. Do not add it to the whole of your gum paste as it will set rock hard.

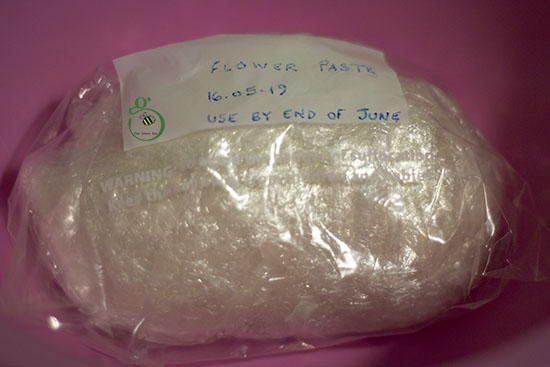
Cover the surface of the paste with a thin coating of coconut oil then wrap in clingfilm and leave overnight. Knead well before using it. It will keep for about 6 weeks if wrapped and kept in a closed container.

Simple Gum paste

You can make a quick and easy version of gum paste using just fondant and tylose but I find it doesn’t have the same elasticity or tear-resistance as ‘proper’ gum paste.

Add 1-2 teaspoons of Tylose powder to 1 pound of fondant. Knead it in and let it rest overnight before using for best results. If you live in a region of high humidity, you might need to add more icing sugar.

Modelling chocolate

Modelling chocolate is delicious and super for sculpting models for cake toppers and such like. It is made with chocolate and golden syrup but the ratio between the two depends upon the type of chocolate you want to use:

  • White chocolate is made in a 4 : 1 ratio, eg, 16 oz white chocolate to 4 oz golden syrup / corn syrup
  • Dark chocolate is made in a 2 : 1 ratio, eg, 16oz dark chocolate to 8 oz golden syrup / corn syrup
  • Candy melts is a 5 : 1 ratio, eg, 15 oz candy melts to 3oz golden syrup / corn syrup

*** I haven’t found a specific recipe for using milk chocolate so I would blend white and dark chocolate together in equal proportions and base it on the dark chocolate recipe. ***

Melt your chocolate in the microwave or over a bain marie. If you’re using a microwave, take it slowly starting with a 1 minute burst then carry on in 30 second bursts, stirring in between. When the chocolate is melted, warm up the golden syrup for about 15 seconds to make it easier to blend with the chocolate.

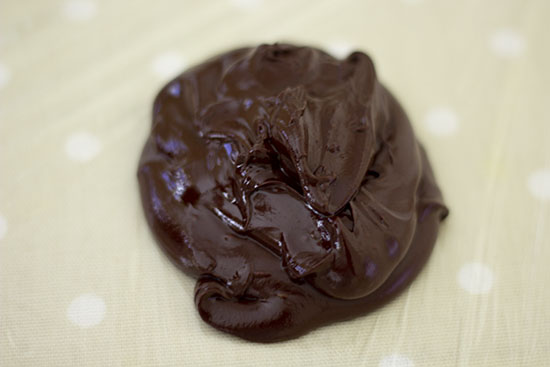
Mix together until all the golden syrup is fully incorporated and looks like soft serve ice cream. Stop stirring! If you keep stirring at this point the mixture will get softer and the cocoa butter will separate out.

Turn the mixture out onto cling film:

Dark chocolate and golden syrup blend

Wrap the chocolate mixture in the cling film and put into the fridge for a few hours to set.

Wrapped in clingfilm ready to go into the fridge to set

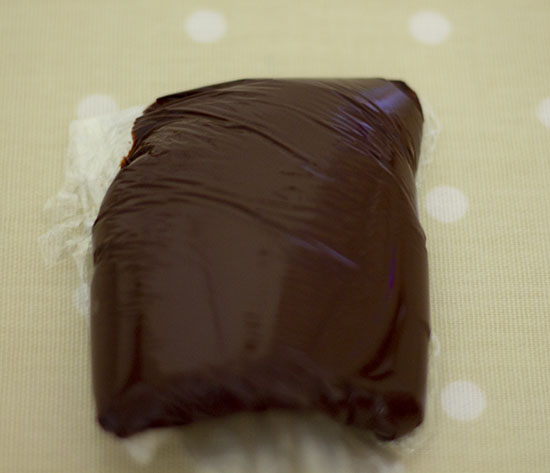
It will set really hard. When you’re ready to use it, just pop it in the microwave for a few seconds at a time until it softens up to a kneadable consistency.

You don’t HAVE to use golden or corn syrup. You just need something sticky and viscous to give the chocolate some elasticity. You could use honey, maple syrup, maybe even treacle. The main thing is to keep the chocolate flavour and smell; you decide which you find least intrusive on the nose and palate.

Wrap modelling chocolate in cling film /saran wrap and store in a zip-lock bag. It will keep for around 3 months this way or pop it in a freezer bag and it will be good for up to 2 years!

Sugar Lace

Sugar lace is amazing. It’s thin, delicate but has good tensile strength. Spread it thinly over silicone lace mats – I think they’re called ‘impression mats’ – and leave to dry then stick on your cakes for beautiful results. Look on Amazon or good cake suppliers to see the wonderful designs available.

Lace topped cake I made a couple of months ago
The lace mat I used for the topper

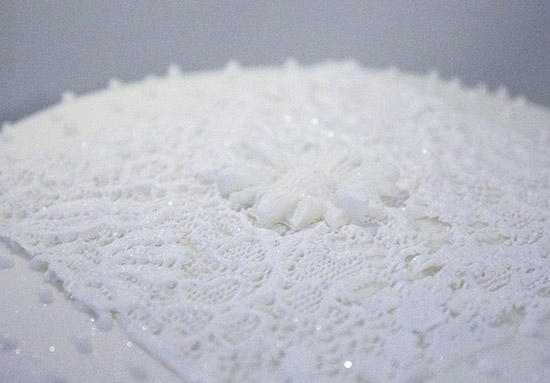
The lace looks delicate but you can handle it quite roughly (not intentionally, 🙂

You can buy it pre-made but my recipe has given me perfect results, is a lot cheaper and you don’t have to wait for delivery.

  • 1 tbsp Tylose powder
  • 60ml Boiling water
  • 1 tbsp Icing sugar
  • 2 tbsp Cornflour
  • 1/2 tsp Liquid glucose
  • A drop of gel food colouring

Note: A little edible lace goes a long way so there’s no need to make a huge amount at any one time but you can double up the recipe if you really want.

Stir the Tylose into the boiling water and let it sit for about 10 mins or so or until the mixture has become clear and no powder is left.

Stir in the icing sugar and cornflour.

Stir in the liquid glucose.

Finally, blend gel food colouring into the mixture if you want coloured lace.

Store the edible lace mixture in the fridge in a closed container; it will keep for about a week. When you want to use it, take it out of the fridge and let it come back to room temperature.

Spread the lace onto silicone lace mats making sure you work it into all the nooks, crannies and crevices but keep it as thin as possible.

Scrape off excess with a cake scraper and return the excess to the rest of the mixture.

Air-dry overnight or place in a coolish oven, approx. 60C/ 110F for about 20 mins to dry it quicker. Check to see if it is dry by very gently picking a corner to see if it lifts away from the mat. If it’s still sticking it needs a little longer to dry.

Store lace decorations between sheets of folded parchment paper in a food container. The lace decorations keep well for a couple of months this way.

Dusting bags

Finally, make your own ‘dusting bag’ to ‘pounce’ icing sugar/cornflour on your work surface to prevent your fondant or paste sticking when being rolled out.

Take a piece of open weave fabric, eg, muslin, and spoon in the cornflour (icing sugar can dry out the fondant or paste but okay if you have nothing else).

Scoop together to form a little bag and secure with an elastic band.

Hope this is useful to you. 🙂

Dandelion seed cake

Trying to get an arty dark photography shot…

This cake is scrumptious. It’s a rich chocolate sponge made with raw, organic cocoa, fresh, home-made raspberry compote and covered in thick ganache with dandelion seed heads for decoration. I love dandelion clocks. The translucent, ethereal effect when light filters through them is quite beautiful.

Dandelions are completely edible. From the flowers to the root and are frequently used in herbal remedies. You have to be careful where you pick them from. These were picked from my back garden so not exposed to car exhaust and I never use chemical insecticides or weed killer (bee friendly). Finally, they are inserted in closed-bottom straws into the cake and removed as soon as I’d finished taking pictures of the cake.

To preserve the heads and stop the seeds from flying away, I made a solution of sugar with boiling water, let it cool then poured it into a spray bottle and sprayed the heads. The sugar solution acts like glue and fixes the seeds in place.

It was an experiment on my part. I’ve used hair spray to take pictures of dandelions and for floral arrangements and knew they could be ‘glued’ into place… but hairspray is full of chemicals that are not food safe.

I think I over-exposed the seed heads and focused on the tallest dandelion rather than the cake but it was my first attempt.

Here’s Gracie keeping watch on my dandelion spraying activity.

Passionfruit curd

The bug to bake something got me again today, mainly because it’s a chilly day.

I decided to make a three-layered lemon sponge cake with lemon buttercream and passionfruit filling.

The passionfruit curd has to be made first because it needs plenty of time to cool down and thicken up.

Mr Bee loves lemon curd and loves passionfruits… so it was fingers crossed that he would love passionfruit curd. Top news! He does. It’s as easy as any other curd to make but does use a LOT of passionfruits.

And leaves the kitchen looking like a crime scene. You wouldn’t expect passionfruit curd and crime scene to sit in the same sentence but there you are.

Crime of passion

The sponges are out of the oven and nicely cool so nearly time to make the buttercream.

I’m wondering whether to add a few tablespoons of elderberry cordial to the buttercream. I’ll decide when I come to do it.

Think I’ll give the cake a yellow to pale yellow ombre effect with maybe fondant daisies on top or maybe meringue kisses as I have a bowl of egg whites to use up. Italian meringue… mmm.

I’ll leave you with a shot of some sweeties I got from my Tai Chi class last night. There was a spread of cakes, sweeties, fruits and nicey things left over from a childrens’ easter craft group and I took a few of these little panda guys:

Panda balls

There are two panda balls in each packet. I thought they’d be ‘nehhh’ but actually, they’re filled with wafer/choc mix which is really nice.

Put me in mind of the chef from South Park… anyone remember his recipe for chocolate salty balls? Ha ha!

The happy little pandas reminded me… Kim Joy from the GBBO has a cookbook coming out in August! I pre-ordered from Amazon today. I loved Kim Joy’s quirky woodland animals and her surreal world of baked goodies. Can’t wait for August!

Easter treats

Can’t believe Easter has been and gone. Seems like Christmas was only a month or so ago.

The garden is starting to bloom:

Daisies
Red fuzzy flowers 🙂
Ladybirds everywhere!
Every twig, every pot…. ladybirds!
Easter egg mold

Chocky egg dotted with fondant flowers

I tempered a bar of Aldi chocolate – which is really nice – and made the egg above. I stuck on some fondant flowers and… ooh la la. A lovely little egg.

Bought this from Ikea.

I bought a few egg ‘boxes’ to fill with little chocs from Ikea and other places.

Easter egg ‘box’


Lemon and Elderflower Sponge Cake

A light sponge made with organic lemons and free range organic eggs (let’s try for happy chickens!).

The flowers are made from a blend of normal roll out fondant icing with Tylose kneaded in and left overnight to cure. (I used 250g roll out icing and 1 tsp Tylose which made up a generous amount of ‘sugar paste’, far more than needed for these flowers).

Mini eggs in my favourite eggcup

Easter is just over a week away and the shops are full of wall-to-wall chocolate eggs.

I had a go at making some of my own. Melted chocolate must be tempered before you can use it in molds.

Tempering chocolate the seeding way

Take a ‘measure’ of chocolate, say, 300g.

Put 100g (a third) to one side and chop it finely.

Put the 200g in a bowl and microwave in 30s bursts, stirring between bursts, until the chocolate reaches a temperature of 46 – 48ºC and the chocolate has fully melted.

Start adding handfuls of the remaining chopped chocolate into the melted chocolate and stir until it’s blended together.

Keep doing this until the chocolate has cooled down to a temperature of 30 – 31ºC.

The chocolate will then be tempered (just eat any chopped chocolate left over!).

Pour the chocolate into molds and leave to cool

Tempered chocolate retains the shine and snap of the original shop-bought chocolate.

I bought a couple of little molds from Søstrene Grene for around 1.50, I think. The chocolate eggs were perfect. I used one to pipe royal icing flowers and writing which turned out quite charming in a homely way but didn’t survive long enough for pictures.

Amazon sells foil for wrapping chocolate and am thinking it might be nice to make a few personalised eggs with some little chocs inside – like Moser Roth mini bunnies.

Bunny nose kisses

Vanilla Mocha Cupcakes

The sponge is chocolatey and malty and fluffy as soft clouds. The buttercream is a duo of vanilla and mocha that complements the sponge beautifully.  The silver balls are crispy silver shells from Tesco, filled with chocolate so lots of complementing going on… ‘Ooh, you’re nice’ ‘So are you!’ 🙂

I used an  868 Open Star nozzle and played around for different effects:

I’m quite besotted with this star nozzle:

I had a bowl of egg whites in the fridge from the day I made lemon curd so used them up making Italian meringue.

I had 5 egg whites and poured them directly into my stand mixer.

I put 400g of sugar (granulated) with 100ml of water into a saucepan and put it on the heat after an initial quick stir – no stirring at all after this first swizzle round. Leave the sugar to dissolve and reach a temperature of 110º (you MUST use a sugar thermometer).

As soon as it gets to 110º, switch the stand mixer on a medium speed to start whisking the whites to break down the proteins in the albumen.

Meanwhile, keep a close eye and check on the temperature of the sugar. As soon as it reaches 118º, take it off the hob and bring it over to the mixer and gently pour it down the side of the mixing bowl.

Take care not to pour it into the centre as the whisk will fling it around and you could get scalded/burned.

The sugar cooks the egg whites while the mixer whisks it to a smooth, glossy, peaks. Leave it whisking until the bowl is cool. You can add a teaspoon or so of vanilla flavouring at this point and whisk that in.

Finally, pop the meringue mix into a piping bag with the nozzle of your choice and pipe onto parchment paper on baking trays.

Place in the oven on a very low heat, around 80º, for 45 mins to maybe an hour.

When done, they should lift off the parchment easily.

They should be crispy on the outside but still have squidgy, gooey softness on the inside.

I love the elegant ‘swan’s neck’ the nozzle produced as it was pulled away.

Just love the 868 – it’s my nozzle star!

Lemon velvet cake with mascarpone frosting

I made a lemon velvet cake with Mascarpone cheese frosting and home-made lemon curd filling. You can use another brand or type of cream cheese, Philadelphia (available in Ireland and UK) is a good one to use but it’s not in the same league as Mascarpone for sheer creamy, smooth luxury. Most cream cheeses are made from whole milk.

Mascarpone is made from double cream. Whichever cheese you go with, it’s an easy frosting to make and if you find buttercream too sweet, cream cheese frosting is for you.

Mascarpone cheese frosting

150g softened unsalted butter,
240g cream cheese
840g icing sugar

Sift the icing sugar into a large mixing bowl, add the butter and Mascarpone and beat together till blended and smooth. Done. Pipe or smooth the frosting over your cake with a spatula and sandwich cake layers together with it. Truly gorgeous.

One word of *caution*; cream cheese frosting gets soft fairly quickly in warm weather so it’s best to eat the frosting while it’s very fresh or make/keep the cakes in a cold atmosphere. You can also freeze Mascarpone frosting for about a month but you’ll need to give it a thorough beating after letting it defrost at room temperature.

Still enjoying dark photography, as you can see from the photo. The initial shot was a little darker so I upped the exposure and increased the white balance to lift it a bit.

Remember the flowers? I posted a How To Make Pineapple Flowers a while back having made a big load and used them to decorate the cake. They give the cake an almost antique quality, reminiscent of an aged auntie’s flowery bonnet.

Mr Bee said not to bother hanging the washing out this morning as it was going to rain. He said it was the equivalent of  “painting the devil on the wall” which means “tempting fate”. He was right. It lashed down.

Cracking on with things

Thursday was supposed to be hotter here (Ireland) than Barcelona. Must have been freezing in Barcelona, then. It was cold even with the heating and fire on. Anyway, a good day to bake.

II made a chocolate fudge cake, covered with chocolate buttercream.

The fondant flowers were dotted all over in a wild celebration of using up the fondant flowers I had stored away…

Gracie liked the oven being on 🙂

Obviously, running the oven costs money but heating costs are heavily subsidised in Ireland due to the fact that 40% of renewable energy is supplied by the cast of River Dance. (See MEP Daniel Hannon – responses Clickety-click.).

Have you ever suspected that inanimate objects harboured malevolent and hostile behaviour somewhere in their molecular structure? There’s a word for that. RESISTENTIALISM. It’s a noun relating to the theory that inanimate objects demonstrate hostile behaviour towards us.

USAGE (from Word a Day: Wordsmith.org):
“Scornful and uncooperative objects — pianos that mock our sausage fingers; computers that develop transient but alarming hypochondria; keys, socks, and teaspoons that scurry off to their secret covens and never return. There are certainly days when resistentialism seems the only explanation.”
Michael Kaplan and Ellen Kaplan; Bozo Sapiens: Why to Err Is Human; Bloomsbury; 2009.

I also love German for lots of  wonderful words; how about:

Backpfeifengesicht – a face in need of a punch (similar to the French tête-à-claque)

or

Zweckentfremdung, which translates to ‘goal alienation’, or ‘using something for a purpose not originally intended’. Our closest English word is ‘utilise’ which is very dull in comparison.